
Orange Pi 5 Setup
Setting up the Orange Pi 5 for PhotonVision
This document is a supplement to the following orange pi 5 guide: https://docs.google.com/document/d/17DNCNHxUo31Rh-7VmXXyn-Y25UtGND3NPoGL9gRosaQ/edit. The reader is meant to read that first and see this document for any corrections, clarification, and recommendations.
You'll want an arducam camera. Amazon link: https://www.amazon.com/Arducam-Distortion-Microphones-Computer-Raspberry/dp/B096M5DKY6?th=1
Flashing the OS
This section follows the "software setup" section from the above guide. When setting up the software you will need Balena Etcher to flash the file similar to the limelight. There is still an ongoing debate on which Linux image you should be using since some of them come from questionable backgrounds. I would still recommend using the debian bullseye from orange pi but armbians images are well trusted.
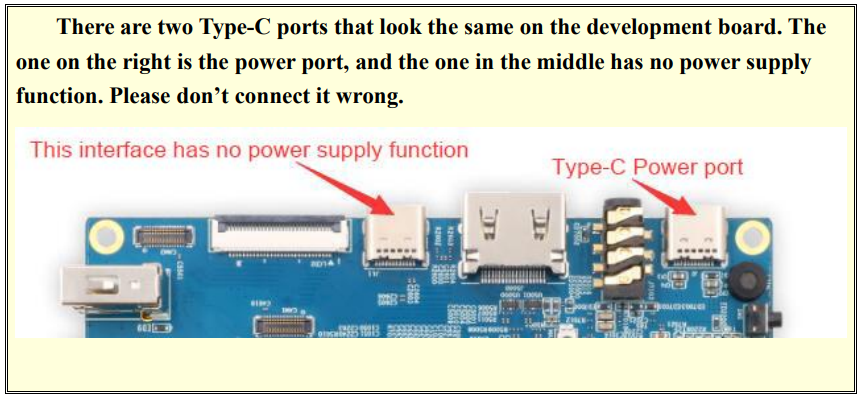
Once you have flashed the SD card with the image you then need to power the orange pi 5.
Connecting to the Orange Pi
You can either attach a monitor and keyboard directly or connect with another computer remotely with SSH. for SSH
SSH connection
For SSH you must have the orange pi and your computer connected to the same network (this can be the robot radio or another network router).
then either through the router lookup the ip address for the orange pi or use the hostname orangepi.local. Then check the login credentials for whatever image you selected. You will want to log in as the default user. checkout this guide for armbian if using that.
SSH into the orange pi with one of the following commands you will then be prompted for the password associated with the image selected
ssh orangepi@orangepi5.local
ssh user_name_here@ip_address_here
Installing Photon Vision
First update the packages and reboot the system with the following
sudo apt-get update
sudo apt-get upgrade -y
sudo reboot now
Then download the install script
wget https://git.io/JJrEP -O install.sh
sudo chmod +x install.sh
Now edit the install script to enable additional cores using the Nano text editor
nano install.shuncomment the line "# AllowCPUs=4-7" by removing the # then save and exit using ctrl+X
install photon vision and reboot
sudo ./install.sh
sudo reboot now
It is also recommended to update to the latest development jar with the following commands
sudo curl https://github.com/PhotonVision/photonvision/releases/download/Dev/photonvision-dev-v2024.1.1-beta-1-2-g12774591-linuxarm64.jar -L --output /opt/photonvision/photonvision.jar
sudo systemctl restart photonvision.service
Connecting to PhotonVision
you now should be able to navigate on a computer connected to the same network to http://photonvision.local:5800 to see the dashboard!
Now your off to the races the official documentation should help more!
A few final remarks
camera calibration I just used the 720X1200 from calibdb.net plugging the camera into a desktop and calibrating that way was much easier than using photon visions build in calibration tool. Once the selected calibration file is uploaded you can switch your apriltag pipeline into 3d mode